
Efficient transmission servicing is crucial for long-haul truck drivers, trucking company owners, fleet managers, and aspiring drivers alike. This guide aims to illuminate the critical aspects of servicing a truck transmission, from preparation and safety to refilling and regular maintenance. Each chapter meticulously covers a crucial element, ensuring you grasp the importance of each step in promoting longevity and optimal performance. By systematically following these steps, you can maintain reliability and avoid costly repairs, enhancing both safety and efficiency on the road.
Groundwork for Longevity: Preparation and Safety When Servicing a Truck Transmission

Preparation and safety are the quiet gatekeepers of a successful transmission service. When a technician approaches a truck transmission with the right frame of mind, the work that follows becomes precise, repeatable, and safer for everyone at the shop or roadside. The foundation here is not just a checklist but a mindset: gather the right information, assemble the correct tools, and create a work environment where the risks of fluid spills, pressurized systems, and mis-torqued fasteners are minimized. This approach respects the complexity of modern transmissions, which vary widely across brands, models, and years. A robust start hinges on three intertwined pillars: accurate vehicle data and official manuals, high-quality tools calibrated to exact specifications, and a disciplined focus on safety that covers the operator, the vehicle, and the surrounding space.
First, the journey begins with solid information. Before any wrench is turned, collect detailed vehicle data. Note the make, model, year, and, crucially, the VIN. This combination unlocks the precise service manual for that specific transmission family. The official service manual is more than a set of numbers; it is a map that reveals torque values, assembly diagrams, seal types, and troubleshooting procedures that differ markedly from one transmission to another. Relying on memory or generic guides is a short path to improper fastener torque, misplaced seals, or incorrect fluid quantities—errors that can escalate into costly repairs or dangerous leaks. As you study the manual, you begin to see how a manual transmission’s lubrication path diverges from an automatic’s, or how a heavy-haul application might specify a different cooler routing than a light-duty work truck. This context is essential because even small deviations in torque or seal seating can lead to oil starvation, differential wear, or efflux during service.
With the data in hand, the next pillar comes into view: the tools. Preparation means arming yourself with the right equipment and knowing how to use it. A high-precision torque wrench is not merely convenient; it is indispensable when tightening bolts to the manufacturer’s exact specification. The same goes for hydraulic fluid extraction and refill systems, which ensure the process remains clean and controlled even when gravity and gravity-fed fills would otherwise invite air pockets or spills. Specialized seal removal tools protect mating surfaces during disassembly, preventing gouges or nicked housings that could become failure points under pressure. An OBD2 diagnostic scanner, though most closely associated with the engine, can read fault codes from the transmission control unit (TCU) and reveal sensors or solenoids that might influence a service decision. Using the wrong tool or bypassing the torque specification can cascade into misalignment of valve bodies, improper seal seating, or premature wear—outcomes no shop can afford.
The third pillar, safety, is not an afterthought but a continuous practice that threads through every step of the process. Work should be carried out in a well-ventilated area to minimize exposure to fumes from engine and transmission fluids. Personal protective equipment, including gloves and safety goggles, must be worn at all times. Transmission work can involve lubricants, solvents, and hydraulic fluid under high pressure; a puncture wound or chemical burn is avoidable with appropriate PPE and careful handling of lines and fittings. When lifting the vehicle, use a hydraulic jack and secure it with jack stands on solid, level ground. Never rely solely on the jack to support the vehicle while you crawl beneath it. The battery should be disconnected to prevent accidental electrical shorts, especially if you are near the electrical connectors to the TCU or related sensors. After any test operation, allow the transmission and the surrounding components to cool before touching hot surfaces or draining warm fluids. This cooling interval reduces the risk of burns and helps you detect leaks more accurately, as hot fluid can mask small seepages.
Beyond PPE and procedural caution, the workspace itself deserves attention. A level, clutter-free area reduces the risk of tripping or dropping essential components. A properly sized drain pan and containment around the work zone prevent environmental contamination and simplify cleanup. A clean bench or tray for fasteners prevents loss of small parts, which can compromise assembly integrity if misplaced. The preparation phase also includes planning for a controlled, incremental workflow. Rather than rushing through steps, visualize the sequence: verify manual guidance, prepare tools, check fluid specifications, secure the vehicle, and then approach disassembly with a measured pace that allows you to verify each connection and seal before proceeding. A mindful workflow not only protects the technician but also preserves the alignment of internal components such as valve bodies and planetary gears that demand exact seating and torque.
The value of preparation extends to ongoing learning and adherence to best practices. Documentation of the service, including fluid type, quantity, and any deviations from standard procedure, creates a traceable record that supports future maintenance decisions and warranty considerations. When questions arise—perhaps a discrepancy between the manual’s torque spec and a stubborn bolt’s resistance—the prudent course is to pause, recheck the manual, and if needed, consult entailed service bulletins or a supervisor. This careful approach reduces the likelihood of rework and keeps the repair within the manufacturer’s intended design margins. It also aligns with a broader professional standard: a well-prepared technician is less likely to overlook a potential hazard and is more capable of identifying early warning signs of trouble, such as an unusual fluid color, an unexpected odor, or a vibration that hints at misalignment rather than simple wear.
Incorporating a broader professional perspective, proper preparation is often reinforced by formal training that emphasizes systematic problem solving, tool discipline, and safety discipline. For technicians who work in specialized fleets or emergency-service environments, continuing education and hands-on training create a common vocabulary and a consistent approach to maintenance. This is echoed in industry discussions about maintenance culture and the importance of standardized procedures. For those seeking further guidance on the value of structured maintenance training, see resources related to fire-trac transmission and equipment maintenance, which illustrate how a formal training mindset translates into uptime and reliability. fire-truck maintenance training importance.
As you proceed from data gathering and tool preparation into the hands-on phase, the emphasis remains clear: accuracy, control, and respect for the system. You are not simply changing fluid or replacing a filter; you are preserving a sophisticated sequence of hydraulic and mechanical interactions that governs how power is transmitted to the wheels. Each step—from confirming the correct transmission fluid specification to ensuring appropriate seating of a new filter and confirming the integrity of the drain plug seal—requires disciplined execution. A small misstep in torque, a hurried wipe of a mating surface, or an overlooked leak can propagate into oil starvation, overheating, or mis-shift conditions once the vehicle returns to service. By anchoring your work in thorough preparation and steadfast safety, you transform a potentially hazardous maintenance task into a controlled, predictable service that extends the life of the transmission and supports consistent vehicle performance on the road or at the job site.
In the end, the chapter on preparation and safety is not merely about avoiding mistakes. It is about creating a professional habit that underpins every maintenance decision. The right manuals, the right tools, and the right safety routines all empower the technician to concentrate on the work itself—the clean, deliberate steps that restore reliability without compromising safety. When you internalize these principles, you do not just service a transmission; you sustain the vehicle’s ability to perform under load, for countless miles, with fewer surprises along the way. The bedrock of that capability lies in preparation that is thoughtful, thorough, and unwavering. External resources, such as comprehensive maintenance best-practice guides, reinforce this approach, offering broader perspectives on safety integration, tool calibration, and procedure verification that support a durable, repeatable service experience. For broader context, see AutoSage’s Truck Repair & Maintenance Best Practices.
null

null
The Clean Start: Draining Old Fluid as the Gateway to a Reliable Truck Transmission Service
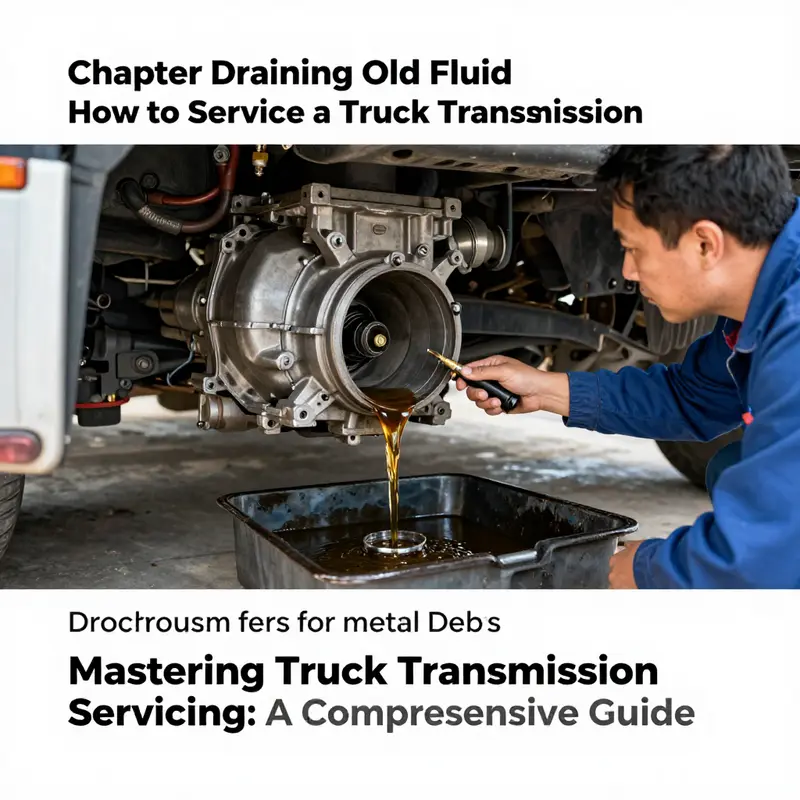
The moment you decide to service a truck transmission, you acknowledge that renewal begins with a clean slate. Draining old fluid is more than a routine task; it is the gatekeeper of long-term reliability. Old oil carries heat, iron, and clutch wear particles that can linger, grind against bearings, and cloud future measurements of health. When done properly, drainage is a clear, deliberate act that sets the stage for the careful rebuild that follows. It is the quiet discipline that separates a quick, shallow service from a thorough renewal that preserves performance on the road and on the job site.
Begin with preparation that centers safety and control. Park the truck on level ground and engage the parking brake. Wheel chocks stay in place to prevent any unintended motion. If you need extra confidence, lift the vehicle with a hydraulic jack and secure it with jack stands. Disconnect the battery to eliminate the risk of accidental electrical shorts during the work. Assemble the essentials—gloves, safety glasses, a drain pan with enough capacity for the expected old fluid, a wrench or socket set to fit the drain plug, a suitable torque wrench, and the correct transmission fluid type as specified by the manufacturer. This is not a place to improvise; a clean, orderly setup reduces the chance of spills and mistakes as the fluid begins to flow.
With the vehicle secured, locate the drain plug at the bottom of the transmission housing. The sight of the plug is a small reminder of how many miles the fluid has already carried heat and debris. Warmth matters here, not a blaze of heat but a steady, safe warmth. If the engine can be run briefly, bringing the transmission to its operating temperature, the fluid becomes less viscous and more willing to carry floating contaminants away from narrow passageways. The warmth is not a reason to rush; it’s a facilitator, enabling a more complete drain while reducing the risk of a stubborn, incomplete emptying.
As the engine hums to life and stabilizes, position the drain container directly under the plug. The old fluid will begin to pool in the pan, gray and heavy with age. Remove the drain plug slowly and with control. If the plug is hot, use a rag or insulated tool to avoid any burns. Allow the fluid to drain completely before removing the plug entirely or lifting the container away. The color and aroma tell their own story. Fresh fluid has a clear, reddish-amber hue and a light, chemical scent. If you see a burnt odor, or if the liquid is layered with metallic flecks or appears excessively dark, those signs warrant close scrutiny of the transmission’s internal wear before proceeding with a refill.
During the drain, keep your eyes open for any metal shavings or unusual debris. A few particles can be normal, especially in older units, but a noticeable surge of metal can signal wear that deserves a deeper look. This moment—watching the fluid flow and listening to the rhythm of the release—offers a practical, tactile sense of the transmission’s condition. When the flow slows to a trickle, you’ve allowed enough time for the bulk of the old fluid to exit. At this stage, you reinstall the drain plug with care. Tighten it to the manufacturer’s specified torque setting using the torque wrench. This step isn’t about brute force; it’s about creating a secure seal that resists leaks without risking the threads.
Most modern transmissions, even those in heavy-duty trucks, share a common principle: a thorough drain creates a predictable environment for the next refill. Once the drain is secure, you can proceed to refill with the correct type and quantity of fluid through the fill port. Avoid the temptation to guess the amount; refer to the owner’s manual or service guide for the exact specification. Overfilling can create foaming, which traps air and undermines lubrication. Underfilling leaves the system starved for fluid during peak heat and pressure. The moment you begin refilling, you’ll feel the subtle difference between a hurried, rough approach and a measured, patient one. You pour slowly, allowing air to escape and the level to settle, watching the dipstick or sight glass as the manual directs. A steady hand at this stage pays dividends in the hours that follow the test drive and in the long arc of the truck’s service life.
Disposal of the old fluid is a responsibility that accompanies every practical drained-down. Do not simply pour it down the drain or onto the ground. Use a container with a secure lid and transport it to a facility that accepts used automotive fluids. Local regulations govern how it’s collected, stored, and recycled. Waste management is part of the service culture, the same discipline that leads a shop to maintain clean floors, labeled containers, and a strict no-spill policy. A clean, compliant finish to the draining process reduces environmental impact and preserves the integrity of the bay for the next job.
The act of draining old fluid is more than a mechanical step; it is a moment of diagnostic potential. As you observe the drained liquid, consider the broader view. If the fluid showed signs of metallic fragments, discoloration beyond a question of shade, or a smell reminiscent of burned insulation, these cues can prompt a more thorough inspection of the transmission’s wear patterns and end-user operation history. In some cases, the next steps may include replacing the filter, if applicable, and performing a more comprehensive flush or a controlled refill sequence that ensures the new fluid penetrates every channel, valve body, and cooler passage. The logic is simple: clean the system so the new fluid can do its job without fighting against old contaminants. This approach aligns with best practices in transmission service procedures and is reinforced by credible guidelines artists in the field rely on, including those compiled by professional service organizations.
In the broader context of fire apparatus maintenance and heavy-duty trucking, drainage is a grounding ritual. It connects the practical with the educational; it links on-the-ground discipline with formal learning, a relationship that a maintenance program should acknowledge. The habit of performing a clean drain supports the consistency required to keep transmissions performing under heavy loads and long hours. It also harmonizes with the training that keeps crews prepared for the rigors of duty. For readers focused on hands-on maintenance training, this step resonates as part of a larger framework that emphasizes discipline, precision, and continuous improvement. See fire-truck-maintenance-training-importance for a deeper look at how these practical skills fit into structured training programs.
The draining step also serves as a reminder that servicing a truck transmission is not a one-off event but a sequence that invites careful attention to detail. After the drain and refill, most technicians proceed to test the system: run the engine, move through the gears, observe for smooth engagement, and check for leaks around the drain plug, the filter housing (if present), and the seals. Listening for abnormal noises and watching for erratic shifting are the kinds of immediate feedback that translate training into action. The fluid’s condition, the absence of leaks, and the stability of shifts during the test drive collectively signal that the renewal has taken hold. At that point, the technician can proceed with the next maintenance steps, such as filter replacement if required and a follow-up fluid level check after the system has circulated the fresh oil and heat cycles have settled.
In essence, draining old fluid is the critical first act of a responsible service. It embodies the shift from guesswork to method, from hope to evidence. It is the moment when the mechanics’ hands honor the transmission’s health with a deliberate, protective measure. And while it is technically straightforward, its impact reverberates in smoother shifts, cooler operation under load, and a lower risk of early failures. The entire process—preparation, controlled draining, secure reassembly, and careful refilling—forms a coherent narrative of maintenance that speaks to practice, patience, and pride in workmanship. It is in these moments that the craft of keeping a truck transmission reliable is most clearly demonstrated, reinforcing why a clean start matters as the gateway to longevity on the road.
External resource for deeper procedural guidance is available from industry standards organizations, which provide detailed, procedure-based references to transmission service techniques and safety considerations. For a comprehensive, official look at the steps and cautions involved in transmission service procedures, consult the following external resource: https://www.ase.com/automotive-topics/transmission-service-procedures
Replacing the Transmission Filter: Keeping Shifts Smooth and the Drivetrain Healthy
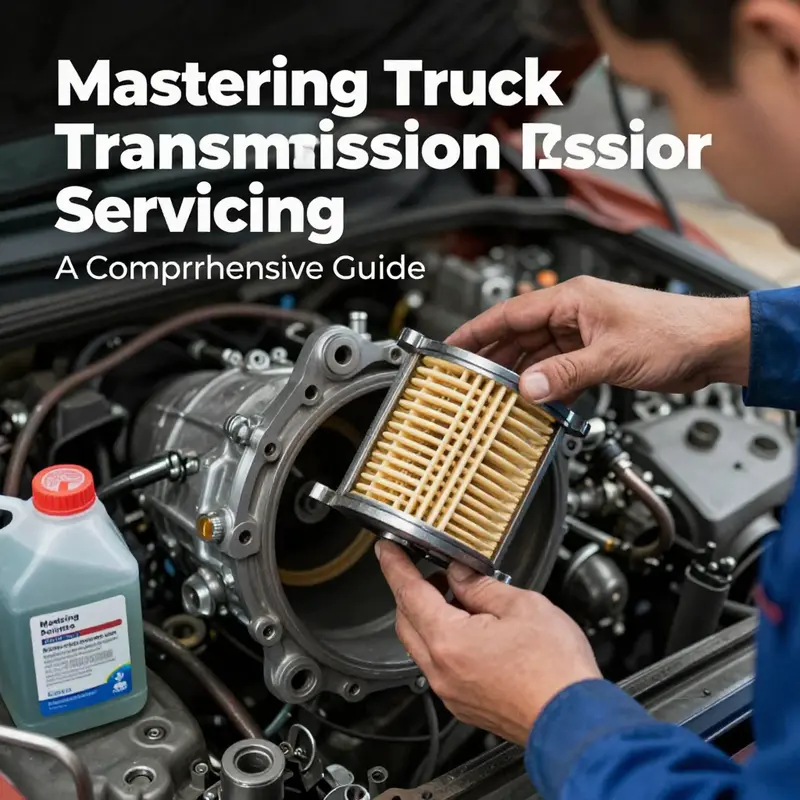
The transmission filter acts like a sieve for the hydraulic fluid, catching debris and wear before it can travel farther into the valve body and gears. When it’s doing its job, shifts stay crisp and the transmission runs quietly; when it becomes clogged, you can notice delayed engagement, harsh or slipping shifts, and unusual heat. Replacing the filter at the recommended interval helps maintain clean fluid and proper pressure across the hydraulic circuits. This chapter walks through a methodical replacement that emphasizes safety, cleanliness, and accuracy.
Preparation begins by parking on a level surface, engine cool, and the parking brake set. Gather the needed tools: a wrench or socket, drain pan, clean rags, a funnel, the replacement filter, and the correct transmission fluid type and quantity. Have new seals or gaskets as required. Working in a tidy area reduces the chance of contamination.
Access to the filter varies by model: some are in the pan and require pan removal; others sit in a distinct housing on the side of the case. The goal is to minimize fluid splash and to inspect the pan and magnets for metal fragments. If the pan is removed, a gasket should be replaced or a sealant applied according to the manufacturer’s guidance.
Drain and inspect: The pan is loosened to drain old fluid. As fluid flows, check color and smell for clues about overall transmission wear — burnt odor or metallic sheen signals trouble beyond the filter. Keep the drain plug and pan clean as you prepare the new filter.
Remove old filter: If it’s part of the pan assembly, you may need to separate the pan and replace the integrated filter. If it’s a standalone housing, remove the mounting bolts and carefully extract the filter, noting its orientation for the new one. Clean mating surfaces to ensure a good seal.
Install new filter: Lubricate the new filter’s seal with a bit of fresh fluid, align with the orientation marker, and thread it in by hand before torquing to spec. If there’s a gasket, new gasket or sealant should be used to prevent leaks. Reinstall the pan with a new gasket or sealant; torque bolts in a cross pattern.
Replenish fluid and prime: Refill with the recommended transmission fluid to the proper level. After refilling, cycle through gears with the engine running and monitor for leaks around the pan, drain plug, and filter housing. The level may drop a bit as air bleeds from the system; allow it to settle and recheck.
Test drive and checks: After a short, controlled drive, recheck the fluid level and look for any signs of leaks or abnormal shifts. If shifts are inconsistent or temperatures rise, review torque specs and seals. A warm, smooth shift and normal temperature indicate success.
Maintenance context: Regular checks of fluid color and level, as well as periodic filter replacement, help preserve hydraulic performance. Keep a record of service intervals and ensure you follow the manufacturer’s torque specs and seals. For readers seeking broader maintenance context, reference materials and training resources can provide deeper understanding of truck transmission systems.
Safety note: Always dispose of used fluid properly and wear gloves and eye protection when handling hot oil. When in doubt, consult the service manual or a qualified technician.
Reassembly and Refilling: The Critical Second Half of Servicing a Truck Transmission

When you’ve finished the inspection, cleaning, and replacement of worn components, the reassembly and refilling stage is where the transmission returns to life. This phase emphasizes following the exact order, respecting torque, and using clean fluid to cushion and lubricate the gears. Reassembly starts with reversing the teardown: seats must align, gears and bearings sit properly, and the torque specs from the manufacturer are your guide. Over-tightening or under-tightening can cause leaks, misalignment, or gear noise, so take your time. After the internal components are reinstalled, reattach the housing and covers, ensuring mounting points are clean and burr-free. Align the clutch or flywheel interface for manuals, and verify pilot bore alignment if a pilot bearing or concentric release is used. Use a light film of transmission fluid on o-rings and seal surfaces to prevent pinching. If the filter is replaced, ensure its seals seat correctly. Then refill the fluid according to the manufacturer’s specification; choose between a full fluid change or a partial fill depending on service. Start the engine, run in Park, Reverse, Neutral, Drive, and check for leaks and correct levels; recheck and top off as needed after a short idle. Keep the work area clean to prevent debris from entering the system, and inspect for misalignment or contact between components during first post-assembly operation. Finally, verify cooling and oiling circuit connections, monitor for heat buildup, and perform a controlled test drive to confirm proper shifting and lubrication. A careful documentation and torque check closes the process, ensuring that fasteners and seals remain secure after the first run. For further context on best-practice maintenance, see the linked training resource. External reference: https://www.autoblog.com/2026/01/28/truck-transmission-service-guide/
Final thoughts
Understanding the intricacies of servicing a truck transmission plays a significant role in optimizing its performance and longevity. By adhering to the outlined steps, including preparation, fluid checks, proper draining, filter replacements, and careful refilling, you can ensure your truck not only operates efficiently but also endures the demands of long-haul journeys. Staying vigilant about regular maintenance schedules and early signs of wear can further enhance the reliability of your truck’s transmission, allowing you to focus on what you do best—driving.